May 29, 2011

Carrot Cake Pancakes Recipe

Pin It
I love pancakes.  This is a love the reaches all the way back into my childhood.  Saturday mornings were very special at my house because my Mom would make us pancakes.  I loved everything about pancakes..the smell, the taste, the different toppings, the giant Pancake my Mom always made with the last of the mix.  Ahhh, pancakes!  I like playing around with pancakes at my house.  I was recently looking through magazine I got at Raley's grocery store when I was visiting family in California.  We don't have Raley's where I live and I'm feeling pretty sad about that.  I found an amazing recipe for Carrot Cake Pancakes and knew I had to give them a try.  Talk about a new favorite recipe at my house!  Yum!

You will need Pancake mix, Carrots, Brown Sugar, Cinnamon, Nutmeg, Vanilla, and milk and eggs depending on your pancake mix.

Mix together what you need to make your pancakes plus the Brown Sugar, Vanilla, Nutmeg, and Cinnamon. 

Then add your grated carrot.  Try not to over mix.  As a kid I thought you had to whip the heck out of the mix.  No wonder my pancakes didn't ever turn out awesome.


Warm up your handy circular griddle and put 4 pancakes, about 1/4 cup of pancake mix each.

I usually watch for my pancakes to puff up a bit and start to bubble before I turn them over.  Am I the only one who makes particularly ugly pancakes the first attempt.  I always have to wait for the second batch to cook to get pretty pancakes.

The picture isn't amazing but the pancakes were delightful!  I just served them with a little butter and Cinnamon Sugar on top.  Yum!  Enjoy!


Carrot Cake Pancakes
Source:  Raley's grocery store magazine

Pancake mix prepared according to package
1 Cup Shredded Carrot
1/2 Cup Brown Sugar
1 tsp Cinnamon
1/2 tsp Ground Nutmeg
1 tsp Vanilla Extract

Prepare your Pancakes according to package directions in a large bowl.  Add the Carrot, Brown Sugar, Cinnamon, Nutmeg and Vanilla extract.

Warm a Griddle over medium heat and when warm pour about 1/4 cup batter for each pancake onto the griddle.  Cook about 3 minutes on each side.

Serve with butter and Cinnamon Sugar for a tasty breakfast.  (The recipe suggested making a cream cheese butter by combining 1/4 cup softened Cream Cheese, 1/2 Cup softened butter, 2 TBSP Brown Sugar and 1/2 tsp Cinnamon in a small bowl.  If you try it you will have to let me know how you liked it).

Approximately 14 Pancakes

121 Calories
13 Carbs
3 Fat
2.5 Protein


Pin It

May 25, 2011

Roasted Butternut Squash & Ham Pasta Recipe

Pin It
Have you ever cooked something in the past that you remember being incredibly delicious?  And,  have you ever made that dish again to find it a bit more complicated than you remember but just as tasty?  That is this recipe.  It was a bit more time consuming than I usually prefer a weeknight meal to be but oh so yummy when it was done.

You will need a Butternut Squash, Cooking spray, Salt, Pepper, Dry Rosemary, Ham, Onion, Noodles, Flour, Milk, Cheese, and Parmesan Cheese.

Mix together the Dry Rosemary (I crushed it up in my hand a little to try and release more flavor), salt, and Pepper.  Then cut your Squash in half and scoop out the seeds.  Then place on a foil lined baking sheet and top with the Rosemary/salt mixture.

Bake 425 Degrees until squash is soft, about 40-45 minutes.  Allow to cool.  This step can be done earlier in the day to make things go a little more quickly come cooking time.

Cook the pasta according to package directions.

Peel and Cut the Butternut squash up into cubes.


Add some Oil to a skillet on Medium heat then hop up half an onion and add the it to the skillet.  Cook about 5 minutes to soften.


Cut the ham into little chunks and add the ham in with the onion and cook for a bit to let the flavors blend and to brown the ham a bit.

In a skillet add flour and 1/2 tsp salt.


Then gradually add milk stirring constantly with a whisk and bring to a boil.


Grate the Cheese.  I used Cheddar cheese but any kind should work.  Last time I made it with Pepper jack and it was wonderful.  Remove the milk mixture from the heat and add the cheese.


Stir until the cheese combines and fully melts.  Yummy & cheesy, goodness!

Drain the noodles and add them into the sauce and mix it all around.


Pour the mixture into an 11x7 baking dish that has been coated with non-stick spray.  Top with the yummy Butternut Squash cubes and sprinkle the Parmesan Cheese on top.

Bake 450 Degrees about 10 minutes.

Enjoy!

Roasted Butternut Squash & Ham Pasta
Source:  Cooking Light magazine via Sherbet Blossom

3/4 tsp salt Divided
1/2 tsp Dry Rosemary
1/4 tsp Black Pepper
1 Butternut Squash
Non-stick Cooking Spray
Ham (I used about 5 slices of Deli Ham) chopped up
1/2 onion Chopped
8 oz Penne Noodles
1/4 C Flour
2 C Milk (I used 1%)
3/4 C Cheese (I used Medium Cheddar) Grated
1/3 C Grated Parmesan Cheese

Pre-heat your over to 425 Degrees.  Cut your Butternut Squash in half and de-seed it.  Line a baking sheet with Foil and place the squash cut side up on the sheet.  Mix together 1/4 tsp Salt, Pepper, and Rosemary and sprinkle on squash.  Bake 40-45 minutes or until squash is soft.  Set aside.

Warm a skillet with 1 TBSP of Olive Oil and add the onion.  Saute until the onion is softened, about 5 minutes.  Add the ham to the onion and cook another 2-3 minutes.

Cook the pasta according to package directions then drain and set aside.  Do not overcook you will want it a little al dente.

In a pan combine flour and 1/2 tsp salt.  Gradually add the milk, stirring constantly with a whisk.  Bring the mixture to a boil and then remove from the heat.  Add grated cheese and stir until the cheese melts.  Add the pasta and toss well to combine.  Transfer to an 11x7 baking dish that has been coated with baking spray.  Top with the squash that has been cut into cubes and sprinkle with the Parmesan cheese.  Bake 10 minutes at 450 degrees.

Enjoy!

Approximately 8 servings

306 Calories
42 Carbs
9 Fat
15.5 Protein

Pin It

May 24, 2011

Sauteed Swiss Chard Recipe

Pin It
This week in my Bountiful Basket I got the prettiest bunch of Swiss Chard I have ever seen.  It was so colorful and fun.  I had never tried Swiss Chard before so I was excited to give them a try.  I wanted to see how it really tasted so I decided to try this recipe because it sounded simple and delicious. 

You will need Swiss Chard, Red Pepper Flakes, Butter, Salt, Olive Oil, and a Garlic Clove which didn't make it into the picture. 

Wash the Swiss Chard very well and cut off the bottom portion of the stalk as it is a bit tough.  Then roughly chop the leaves into one inch bits.
In a non-stick pan add your Olive Oil and let it get good and warm.  Then peel and Slice the garlic and add to the pan along with the red pepper flakes.  Let this cook about 1 minute.


Add your chard and stir well.  Cover and cook about 5 minutes.  At 5 minutes stir it around well and if it seems dry add 1-2 TBSP of water.  Cook another 5 minutes.

Add to a bowl and top with a bit of Butter and Salt & Pepper.

Enjoy!
Sauteed Swiss Chard
Source:  Simply Recipes

1 Bunch Swiss Chard
1 Garlic Clove, Sliced
2 TBSP Olive Oil
2 TBSP Water
Pinch of Pepper Flakes
1 tsp Butter
Salt & Pepper

Rinse the Swiss Chard well.  Chop off the tough bottom part of the stalk and discard or use in another recipe.  Roughly chop the leaves into about 1 inch bits.

Heat a non-stick skillet over med heat and add the Olive Oil.  Once warm add the sliced Garlic and a pinch of red pepper flakes.  Allow to cook about 1 minute.  Then add the Swiss Chard and stir well.  Cover and let cook about 5 minutes.  Stir well and if it looks dry add 1-2 TBSP of the water and cook another 5 minutes.  Remove from pan and add the butter and Salt & Pepper.  Enjoy!

Approximately 4 Servings

95 Calories
5.5 Carbs
8 Fat
2.5 Protein

Pin It

May 19, 2011

Tin Foil Dinner Recipe

Pin It
It has been super rainy the last few days.  I'm not exactly complaining because I love the rain and am more than happy to enjoy cool weather before the wicked hot summer days really start up.  But with the rain and cooler weather comes my desire to eat hearty foods.  I decided to cook up some tin foil dinners!  I've always called them tin foil dinners but love that some people call them Hobo Dinner.  Am I the only one who loves the word Hobo?  When I was a kid we would sometimes eat these for church activities or when camping.  I always loved them even though they seemed to take a million years to cook when done in a camp fire.  These turned out great and were just the hearty stew like dinner that the weather called for.

This is a fun recipe that you can play around with the ingredients.  I used 3 Carrots, 5 Red Potatoes, an Onion, half a head of Broccoli, 2 Celery, a Can of Reduced fat Cream of Mushroom Soup, and 1 1/2 lbs of Ground Beef.  You will also need Aluminum Foil.

Chop up all your veggies and try to make them uniform in size.


Get a sheet of foil large enough for a hamburger patty and veggies and place the patty in the center.  Salt and Pepper to your taste.  Top with a couple spoonfuls of the Cream of Mushroom Soup.

Then add a bunch of yummy veggies into the mix.  I added a bit more salt and pepper at this point.

Then fold up the two longer sides to create a pouch.

Fold in the other sides and crimp together to make a good seal.

Then place your Tin Foil Dinners on a baking sheet evenly spaced.  Bake at 350 for about an hour or until the veggies are soft.

Carefully unfold the pouches as they will be hot.  Oh boy, supper is looking yummy at my house!

Enjoy!

Tin Foil Dinner Recipe (Hobo Dinner)
Source:  Ladybird Ln

1 1/2 pounds Lean Ground Beef
3 Carrots, Peeled and cut into chunks
5 Red Potatoes cut into chunks
2 Celery cut into chunks
1 Onion Cut into wedges
1/2 head of Broccoli cut into small florets
1 Can 98% Fat Free Cream of Mushroom Soup
Tin Foil

Pre-heat oven to 350.  Tear off 6 good sized pieces of tin foil.  Portion your meat and veggies into 6.  Shape your hamburger into patties and place in the middle of the tin foil sheet and season with salt and pepper.  Top with about 2 TBSP of the Cream of Mushroom Soup.  Then place the portion of veggies on top and season a bit more with salt and pepper.  Folding up the two longer sides of the foil you will create a little pouch.  Then fold up the shorter sides and kind of roll and crimp them to create a good seal.  Bake at 350 for about an hour or until veggies are soft.  Open the tin foil pouch carefully as it will be hot and steamy.

Enjoy!

Approximately 6 Servings

470 Calories
36 Carbs
25 Fat
24.5 Protein

Pin It

May 18, 2011

Cauliflower Curry Stew Recipe

Pin It
I love cooking with curry, I love cooking vegetarian, and I super LOVE one pot suppers.  So this recipe turned out to be everything I love all in one pot.  I found this recipe in my January 2009 Good Housekeeping magazine.


You'll need Plain Yogurt, Carrots, Quinoa, Garbanzo Beans, Vegetable Broth, Curry Powder, Olive Oil, Cauliflower, and Cilantro.  The recipe called for an onion also but the one I  had less than desirable so I chucked it.

Start a dutch oven or pan warming up and add 1 TBSP of Olive Oil.  When warm add 3 chopped carrots and cook stirring occasionally till softened about 10-12 minutes.   If you have a pleasing onion please add it at this point.

Stir in Grated Ginger, Curry Powder and Salt.  Cook 3 minutes stirring constantly.  Add the broth in, cover, and heat to boiling.

Stir in Cauliflower and Garbanzo Beans.  Cover and cook on medium 15-20 minutes.  Gently stirring every so often until cauliflower is tender.

Cook Quinoa according to package directions.  For some reason I've heard several different sets of instructions.  I rinsed 1 cup Quinoa well then added to a pan with 2 cups cold water and covered it up.  I brought it to a boil and took the lid off and let it cook until all the liquid was absorbed.  About 15 minutes.

Add chopped Cilantro and Plain Yogurt.  In a bowl add the Stew to your Quinoa and top with a little more Cilantro and Yogurt.  Enjoy!

Cauliflower Curry Stew
Source: Good Housekeeping

1 TBSP Olive Oil
3 Carrots chopped
1 Onion chopped
1 Cup Quinoa
1 TBSP Grated Fresh Ginger
1 TBSP Curry Powder
3/4 tsp Salt
2 1/2 Cup Vegetable Broth
1 head Cauliflower cut into small florets (4 1/2 cups)
2 Cans Garbanzo Beans, rinsed and drained
1/2 Cup Cilantro chopped
1/4 Cup low fat Plain Yogurt plus extra for serving

In a large dutch over heat oil on medium heat until hot.  Add carrots and onion and cook until lightly browned and tender 10-12 minutes.  Stir frequently.

Stir in Ginger, Curry powder and Salt into carrot mixture and cook 3 minutes stirring constantly.  Add the broth and cover until it is heated to boiling.  Stir in Cauliflower and Garbanzo Beans.  Cover and cook on medium 15-20 minutes gently stirring every so often until the Cauliflower is tender.

Meanwhile prepare the Quinoa.

To serve, stir chopped cilantro and 1/4 cup yogurt into stew.  Spoon Quinoa into a serving bowl and top with stew.  Add an additional dollop of yogurt to the top and garnish with Cilantro.

Enjoy!

Approximately 8 Servings

360 Calories
68 Carbs
5 Fat
12 Protein

Pin It

May 17, 2011

Pickled Daikon Recipe

Pin It
I made this recipe a while ago when I got the Daikon Radishes in my Bountiful Basket.  I never took a final food photo so I wasn't going to post it..but decided it was a tasty dish and I might as well post it all the same.  This recipe has a very light pickled taste and is very mild and yummy.  I found myself snacking on it here and there and really enjoyed it.  I used a mason jar to try and keep the pickle smell to a minimum..but was still able to smell it in my fridge a bit.  I wouldn't use a plastic container to do this as the reviews indicated that the smell really comes out with that plastic.  You can find the original recipe here.

You will need a Daikon Radish, Black Pepper, Rice Vinegar, Sesame Oil, and Salt


Peel the Daikon and Cut into little chunks.  Then add the Daikon and Salt to a bowl and mix together well.


Cover and refrigerate until 1-2 TBSP of liquid is released.  About 30 minutes.  Here is a peek at my Daikon liquid.

Transfer Daikon to a colander and rinse very well.  You are trying to remove as much of the salt as possible.

Then transfer to a Paper Towel and pat dry.

Place the Daikon in a mason jar and add the Pepper, Rice Vinegar, and Sesame Oil.  Place the lid on and shake well to distribute the flavors and Refrigerate at least 8 hours.


I shook it every so often to ensure that the pickling liquid was moved around.  Then I tried it the next afternoon so it had sat for a little over 24 hours.  It was very nice and mild.  Enjoy!
 Pickled Daikon
Source:  All Recipes by MARBALET

1 Daikon Chopped into chunks
3/4 tsp Salt
1 TBSP Rice Vinegar
1/4 tsp Ground Black Pepper
1/4 teaspoon sesame oil
  
In a mixing bowl Add the chopped Daikon and the salt, mix well. Cover, and refrigerate until 1 to 2 tablespoons of liquid is released, about 30 minutes. 

Transfer the Daikon to a colander and rinse well removing as much salt as possible. Move to a paper towel and blot the water off. Move Daikon into a mason jar and add the rice vinegar, black pepper and, sesame oil. Top with the lid and ring and refrigerate at least 8 hours. 

Enjoy!


Approximate Nutritional info for whole batch


52 Calories
7 Carbs
1 Fat
0 Protein

Pin It

May 15, 2011

Chicken Kiev Recipe

Pin It
Saturday morning I woke up very early and drug my kids out of bed to do a 5k.  I'm not a runner so I walked it with the hopes of finishing within an hour.  I didn't get an official time but according to my phone it was just over an hour.  I'm doing another 5k this coming Saturday and I intend to beat my time by at least 5 minutes.  Eventually I would like to be able to run a 5k and beyond...but for now walking one in under and hour will be my goal.  I made this yummy Chicken Kiev for dinner last night and had fun using my meat club.  I don't remember where the recipe came from..

You'll need Softened Butter, Chives, Garlic, Boneless Skinless Chicken Breasts, Crushed Corn Flakes, Parsley, Paprika, and Buttermilk.


In a small bowl mix together very soft butter,  minced Garlic Clove, and finely minced Chives.  First time I've ever made a gourmet butter and it was fun.  I gave it a little taste and boy does it have a kick with the raw Garlic.

Using parchment or wax paper shape the butter into a 3 inch by 2 inch block.  Place the Butter block in the freezer for 30 minutes or until firm.

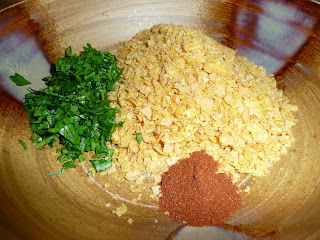
In a shallow bowl combine crushed corn flakes, Paprika, and Chopped Parsley.

In another shallow bowl add your Buttermilk.


Put your Chicken into a zip top bag so Chicken bits don't fly all over your kitchen also you will need to get your meat club out.  Pound the chicken until it is about 1/4 inch thickness.


Take your butter out of the freezer and separate it into 4 equal portions.

Place the butter into the middle of the flattened Chicken

Roll it up and secure with a Toothpick.

Dip the Chicken into the Buttermilk

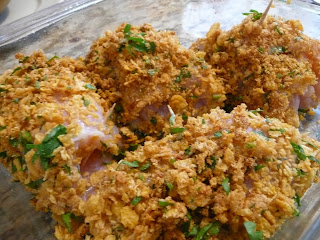
Then evenly coat the chicken with the Corn Flakes mix

Place chicken in a 13x 9 baking dish that has been sprayed with cooking spray

Bake 425 Degrees 35-40 minutes until done


Enjoy!
 Chicken Kiev

2 TBSP Softened Butter
1 TBSP Minced Chives
1 Garlic Clove Minced
4 Boneless Chicken Breasts
3/4 C Crushed Cornflakes
2 TBSP Minced Fresh Parsley
1/2 tsp Paprika
1/3 C Buttermilk

In a small bowl combine Butter, Chives, and Garlic.  Shape into a 3 inch by 2 inch block, cover and freeze till firm about 30 minutes.

Flatten Chicken to 1/4 inch thickness.  Cut butter into 4 equal bits and place one in the center of each chicken breast.  Fold sides over and secure with a toothpick.

In a shallow bowl mix together Corn Flakes, Paprika, and Parsley.  In another shallow bowl add your buttermilk.  Dip your chicken into the buttermilk and then coat evenly with Corn Flake mixture.

Place chicken seam side down in a greased 13 x 9 in pan and bake uncovered 425 degrees 35-40 minutes or until chicken is done.  Discard Toothpicks.

Enjoy!

Approximately 4 servings

387 Calories
17 Carbs
9 Fat
56 Protein

Pin It