Showing posts with label Low Calorie. Show all posts

December 29, 2012

Ham Roll Appetizer Recipe

Pin It
Have I mentioned that I am less than 3 weeks away from having my third child!  This is so crazy to me.  I am so not ready...is it possible to request more time?  Although, with how uncomfortable I am maybe I am ready after all.  Such a shame that things get so crowded at the end of pregnancy.  I was remembering back to when I had my first child recently.  One of the funnier memories involves a delicious appetizer and my baby shower.

My Mom and sister threw me a very sweet baby shower and you should have seen the spread of food they prepared.  It was fantastic in every way.  There was so much amazing and delectable treats that it was hard to choose what to snack on.  They made on of my favorites..Ham Rolls!  They are always so yummy and a bonus they are pretty low calorie.  I must have gobbled down a dozen ham rolls, at least.  After the party was over I peeked in the fridge and found that the ham that I had bee consuming all afternoon had expired!!!  Not just by a day or two either.  It was horrible!  Luckily nobody got sick and my sister decided to always check the expiration date when shopping at the Walmart.  You should give these babies a try when you have a party to go to.  Perfect any time of year and in any setting. 


You will need Cream Cheese (the whipped kind spreads more easily), Ham, and Green Onions.
Grab a slice of Ham.

Spread the Cream Cheese almost to the edges of the Ham.
Slice the Green Onion up. 
Evenly sprinkle a little Green Onion over the meat.

Roll the ham up.
Slice into little rolls and Enjoy!


Ham Roll Appetizer Recipe

Ham
Cream Cheese
Green Onion

Evenly spread a TBSP or so of the Cream Cheese over the top of the Ham slice.  Chop the Green Onion up into little slices and sprinkle over the top of the Cream Cheese.  Roll the ham up and slice into mini rolls. 

Enjoy! Pin It

September 7, 2012

Summer Vegetable Casserole Recipe

Pin It
Summer is very quickly coming to a close.  My heart is breaking a little right now.  I got up early this morning and noticed a significant chill in the air.  What, a chill!?  I'm not ready for a chill yet!  I even wished I had put a sweater on before I left the house.  I've been enjoying my summer way too much to have it get chilly.  Luckily it warmed right up once the sun came out.  My oldest daughter got to play in the water at her cousins house after preschool which was a perfect way to play off some of her extra energy.

Before summer officially ends I found a yummy recipe for you.  It was seriously simple and my oldest gobbled it up.  My youngest who is just shy of 2 was a bit picky and wouldn't even give it a taste.  My husband and I both really enjoyed this and it made me wish that I had planted a fantastic garden this year so I could use my own produce.  Too bad this year I took the lazy route and no garden was planted.


You will need a Yellow Squash, Zucchini, Onion, Potato, Garlic, Tomato, Cheddar Cheese, Canola Oil, Salt & Pepper, and a Mandolin.
Start by chopping your Onion and mincing the Garlic.  Warm a pan over medium heat, add the Canola Oil, Onion, and Garlic and cook about 5 minutes until the Onion is softened.

Meanwhile, using the Mandolin slice the Potato, Zucchini, Yellow Squash, and Tomato very thin.  I cut the Tomato with a knife to avoid smashing it and making a huge mess with the mandolin.

Spray a casserole dish with non-stick spray.

Place the Onion/Garlic mixture in the dish and spread it out evenly along the bottom.

Place the sliced veggies in the dish alternating the veggies to get a good mixture.  Sprinkle with a bit of Salt & Pepper.

Grab your trusty bottle of Italian Seasoning.

Sprinkle it over the top to your liking.

Cover the dish with foil and bake in a 400 degree oven for 30 minutes.


Meanwhile grate the Cheese.  Make sure to feed some to your 2 year old or she will get really super mad at you.

When the timer dings grab the casserole out and sprinkle the cheese over the top.  Place back in the over for another 15-20 minutes.  You want the veggies to be good and tender at this point.
Gooey Cheesy Goodness.  Gotta love the Cheese.
Enjoy!


Summer Vegetable Casserole Recipe
Source:  Budget Bytes

1 TBSP Canola Oil
1 Yellow Onion
1 tsp Minced Garlic
1 Zucchini
1 Yellow Squash
1 Potato (I used a Yukon Gold)
1 Tomato
1-1 1/2 tsp Italian Seasoning
1 C Shredded Cheddar Cheese
Salt & Pepper to taste

Preheat your oven to 400 degrees.

Chop the Onion and Mince the Garlic.  Warm a skillet over medium heat and add in the Canola Oil, Onion, and Garlic.  Saute until the Onion is softened, about 5 minutes.

Meanwhile, using the Mandolin slice the Zucchini, Yellow Squash, and Potato as thinly as you can.  Using a knife thinly slice the tomato.

Spray a casserole dish with non-stick spray.  Place the sliced veggies standing up alternating the veggies for ultimate flavor distribution.  Sprinkle with a bit of Salt & Pepper to taste (remember that potatoes like Salt).  Then sprinkle the Italian Seasoning over the veggies.

Cover the dish with tin foil and bake for 30 minutes.  Remove the foil and sprinkle the Shredded Cheese all over the veggies.  Place back in the oven and bake another 15-20 minutes.  You want all the Veggies to be tender and the Cheese to be melted.

Enjoy!

Pin It

July 22, 2012

Mexican Salsa Crock Pot Chicken Recipe

Pin It
I just finished up a lovely and relaxing vacation.  We spent a week on the road and ended up in Northern California in a little town Called Burney.  This quaint little town is home to one of the most spectacular Waterfalls I have ever had the luxury to see.  If you ever find yourself in Burney do not miss the chance to see the McArthur-Burney Falls, they are spectacular.  We enjoyed the Falls on a lovely 75ish degree day and went on a little hike in the woods surrounding the river.  Perfect day!

Upon returning home it was back to the real world and back to cooking up some mighty fine eats.  I tried this little gem of a meal which my whole family loved.  We all gobbled it up after some serious traveling induced hunger.  I hope you will give it a try..cause it is tasty!

You will need a Slow Cooker/ Crock Pot, Chicken Breasts, Taco Seasoning, Cream of Mushroom Soup, Sour Cream, and Salsa.

Add the Salsa, Cream of Mushroom Soup, and Taco Seasoning to your Crock pot and mix it all together well.

Salt & Pepper your Chicken on both sides then nestle them into the spicy bath of goodness.

Set your Slow Cooker to Low and let it cook for 6 hours.  Whenever I cook with the Crock Pot I think of that Ronco Rotisserie where they say "Set it and Forget it!"  I just love my Crock Pot!

When the cooking time is up grab some tongs or a couple of forks and shred the Chicken.  It will be so tender and luscious that it will shred very easily.

Mix in the Sour Cream..Oh yeah!  This makes it so creamy and good!

Serve on top of some Rice with a bit of Shredded Cheese, Diced Avocado, and Cilantro.  Or you can use it as a taco filling, or you can use it in a taco Salad, or...the possibilities are endless!  Just make this cause it's crazy tasty!


Mexican Salsa Crock Pot Chicken Recipe
Source:  Chef Mommy & original Source:  Fake Ginger

3 Chicken Breasts
1 Can Cream of Mushroom Soup (I used the Healthy Request one)
1 C Salsa
1-2 TBSP Taco Seasoning
1 C Sour Cream

Toppings:

Shredded Cheese
Cilantro
Diced Avocado

Place the Salsa, Cream of Mushroom Soup, and Taco Seasoning in the bowl of your Slow Cooker and mix together well.  Salt & Pepper both sides of your Chicken and nestle it in the Soup/Salsa mixture.  Set the cooker to Low temperature and let cook for 6 hours or until the Chicken is tender.

When the cooking time is over shred the chicken in the Crock Pot with tongs or two forks.  Mix in the Sour Cream and serve with Shredded Cheese, Cilantro, and Diced Avocado over Rice...or any way you want.

Enjoy!


Pin It

July 10, 2012

Southwest stuffed Bell Pepper Recipe

Pin It
I have been loving this summer.  My family purchased season passes to a waterslide this year and we have really been enjoying them.  My oldest, who is 4, is a real daredevil and wants to go on all the scary slides.  The other day I finally decided to take her on the big slides.  You can hold a child on your lap and go down a few of the less wild rides.  We get up to the top and the guy tells me that I have to hold my glasses.  Imagine..I am holding onto the tube for dear life with one hand.  Holding my glasses with the other hand with that arm wrapped around my child (who doesn't know how to swim but was wearing a life jacket).  Let me just say it was a wild ride.  She loved it of course!  So after that I left my glasses in my bag and we went on three more slides.  So much fun!

I saw this recipe on Pinterest and it looked so pretty and sounded very yummy.  I decided to give it a try.  My husband, my 4 year old, and myself really liked this dish.  It was very fresh tasting.  I love Southwestern flavors and all their glory.  My 1 1/2 year old wouldn't even give it a try.  I guess she is getting to that picky stage.  Give it a try, I think your family will like it too.  That is unless you have a picky toddler...

You will need frozen or canned Corn, Taco Seasoning, Salsa, Canola Oil, Black Beans, Sour Cream, Onion, Ground Turkey, Shredded Cheese, Avocado, Cooked Quinoa (mine has peas in it from leftovers), Bell Peppers, and Cilantro.

Cut the Peppers in half and pull out the seeds and membranes.  Leave the stems on because that makes them look neato.

You can use your awesome Misto tool to mist the Peppers with Canola Oil or you can just rub a little oil all over the peppers.  Place in a 400 degree oven and cook for 20-25 minutes until they are tender.

Meanwhile..warm a non stick pan over medium heat and add a bit of Canola Oil.  Cook the onions for a few minutes until they begin to soften.

Add the Ground Turkey, Taco Seasoning, and a bit of Salt & Pepper to the pan and cook until the Turkey is fully cooked.

Then add in the Quinoa, Black Beans, and Corn.

Add in your favorite Salsa.  I used Pace Picante because it's my one true salsa love.  Mix everything together really well.


When the peppers are tender stuff them with the Quinoa/turkey mixture.  Be generous.  Place back in the oven and cook for another 15-20 minutes.

Top with shredded Cheese and pop back in the oven for a couple of minutes until the Cheese melts.

Gooey melty Cheese is the very best.

Top with a bit of Sour Cream, Cilantro, and serve with a sliced Avocado.  Enjoy!


Southwest Stuffed Bell Pepper Recipe
Source:  Simply Love Food

3 Bell Peppers, cut in half remove the seeds and membranes but leave the stem on
Canola Oil
1/2 Onion diced
1/2 LB Ground Turkey
1 Heaping TBSP Taco Seasoning
2 C cooked Quinoa
1 can Black Beans, Drained and rinsed
1/2 C frozen or canned Corn
1 15-16 oz jar Salsa any flavor
1 C shredded Cheddar Cheese

Top With:

Cilantro
Sour Cream
Avocado

Pre-heat your oven to 400 degrees.  Using a Misto spray the Peppers on all sides with Canola Oil.  You can also rub the oil on with your fingers if you don't have a Misto.  Place the peppers in a baking dish and cook for 20-25 minutes until the Peppers are tender.

Meanwhile, add a tsp or so of Canola oil to a non-stick skillet over medium heat.  Saute the Onion for a couple of minutes until it begins to soften.  Add in the Ground Turkey and Taco Seasoning and cook until the turkey is fully browned.

Add in the Corn, Black Beans, cooked Quinoa, and Salsa mixing everything together really well.  When the Peppers come out of the oven generously stuff them with the Quinoa/Turkey mixture.  Place back in the oven and cook an additional 15-20 minutes.

Remove the Peppers from the oven and sprinkle with Cheddar Cheese.  Place back in the oven for a minute or two, until the Cheese is melted.  Serve with Cilantro, Sour Cream, and sliced Avocado.

Enjoy! Pin It

June 28, 2012

Lemony Salmon with a Creamy Dill Sauce Recipe

Pin It
This morning I was cruising around Facebook and came across a music video about farming sung to the tune of LMFAO's Sexy and I know it song.  It's called I'm Farming and I Grow It.  Gotta feed everybody!  Gotta feed everybody!  So funny to me.  Is it bad to admit that I love the original song too?  Hopefully not because it really makes me laugh.

On a totally unrelated subject..I made some more yummy salmon the other day.  I saw the recipe here and had to try it when I read about the sauce.  There is just something about Salmon and the summertime that really goes together for me.  Especially when you whip up an amazing, creamy, dreamy, sauce using fresh herbs.  We all loved this recipe and it came together so quickly and easily.  Perfect for a warm summer night.  Plus, the leftover Creamy Dill sauce was amazing on pita crackers.


You will need Cilantro, Plain Yogurt, Salmon, dry Oregano, Cumin, Quinoa, Cream, Lemon, Fresh Dill, Fresh Parsley, Garlic, Canola Oil, and Frozen Peas.

Season both sides of the Salmon with Salt & Pepper.  Place on a parchment lined baking sheet and top each piece of Salmon with a Lemon slice.  Bake at 350 degrees for 30 minutes.

Meanwhile grab your scary food processor, or a blender, and add in the Yogurt, Garlic, Cream, Dill, Cilantro, Parsley, Dry Oregano, Lemon Juice, Canola Oil, and a bit of Salt & Pepper.

Blend until smooth and creamy.  Taste and add a little more Salt & Pepper or herbs as desired.

Grab the Quinoa and give it a good rinsing.  Add the Water, Cumin, Frozen Peas, and Quinoa to a pot and cook according to Quinoa package instructions.


Warm a non-stick skillet over medium heat and add the Salmon fillets.  Cook on each side for a few minutes just to crisp up the outside.  No need to cook very long as the Salmon is fully cooked.

When the Quinoa is done place it on a plate, Place the Salmon to it, and top with a drizzle of the creamy sauce. 


Lemony Salmon with a Creamy Dill Sauce Recipe
Source:  Sunshine and Smile

Sauce:

1 C Plain Yogurt
1/4 C Cream
1/2 C fresh Dill, roughly chopped
1/4 C fresh  Cilantro, roughly chopped
1/4 C fresh Parsley, roughly chopped
1 tsp dry Oregano
1 Clove Garlic
1 tsp fresh Lemon Juice
2 TBSP Canola Oil
Salt & Pepper to taste


Everything else:

3 Salmon Fillets
1 C frozen Peas
1 1/2 tsp ground Cumin
1 C Quinoa, rinsed well
3 slices of Lemon
Salt & Pepper
1 tsp Canola Oil

Season both sides of the Salmon and place on a parchment lined baking sheet.  Top with a slice of Lemon and bake for 30 minutes at 350 degrees.

Meanwhile, in a food processor or blender add the Yogurt, Cream, Dill, Cilantro, Parsley, dry Oregano, Garlic Clove, Lemon Juice, Canola Oil, and Salt & Pepper.  Process for a couple of minutes until all of the ingredients are chopped and well combined.  You will end up with a lovely white sauce with yummy herb bits throughout.  Set aside or refrigerate until ready.  (This step can be done ahead of time)

Now add the rinsed Quinoa, frozen Peas, and Cumin to a saucepan and cook according to the Quinoa package instructions.

When the Salmon is finished cooking, warm a large non-stick skillet over medium heat.  Add a bit of Canola Oil (I just gave the pan a good spray with my Misto and it worked great) and cook each side of the Salmon for a couple of minutes to crisp it up a bit.

Place the Quinoa on a plate, top with the Salmon, and drizzle with the Creamy Dill sauce.

Enjoy!

____________________________________________________________________________

Last year I was cooking up a fun, easy, and delicious Tinfoil Dinner
and
a delicious Butternut Squash and Ham pasta dish Pin It

May 9, 2012

Overnight PB, Banana, & Blueberries Oatmeal Recipe and Giveaway # 4

Pin It
We eat a lot of oatmeal at my house.  It is one of my favorite go to breakfasts with a bit of raisins and pecans added in.  Lately I have been seeing lots and lots of overnight refrigerator oats online.  Oats that don't require cooking?  Oats that soften and taste good after a night in the fridge?  Oats without Raisins or Pecans?  This sounded a bit strange but also crazy delicious.  The more I saw online the more I had to try it.  So I did..and my husband and I loved it.  The kids didn't go for this flavor much but I think they would like it if it had been a bit sweeter.  I will absolutely be trying this again and playing around with different flavors.  I really liked having the Chia Sees in the mixture.  Very good.   I found the recipe here and made a few little changes of my own. 

You will need Old Fashioned Oats, Ripe Bananas, Peanut Butter, Half Pint Jars, Blueberries, Yogurt, Honey, Chia Seeds, and Milk.


Add the Oats and Chia seeds to the Half Pint Jar.

Next add in the Yogurt and Honey.

Add in a good scoop of Peanut Butter.
Then add sliced Bananas and fresh Blueberries.


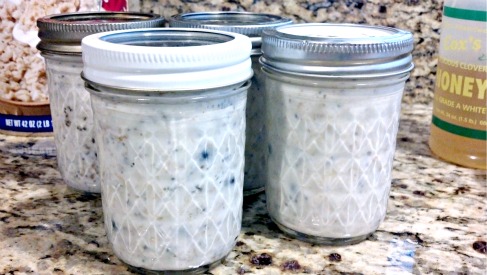
Pour in some Milk and put the lid and ring on the jar.

Then shake, shake, shake the jar.  I also gave the contents of the jar a good stirring because  a bit of the honey stuck to the side and didn't want to mix in.  Pop in the fridge and let sit overnight. 
The next morning give the jar another little shake.  Take off the lid and top with a few fresh Blueberries.  Add a little honey for added sweetness.


Yum!  Enjoy!
My tiny one wouldn't let the spoon get any closer to her mouth than this.  Little stinker wouldn't even give it a try!

My oldest tried a few bites but in the end chose to eat Krave Cereal instead.


Overnight PB, Banana, & Blueberries Oatmeal Recipe per jar
Source:  The Yummy Life

1/4 C Old Fashioned Oats, uncooked
1/3 C Milk
1/4 C lowfat Yogurt (I used plain Fage Greek yogurt)
1 1/2 tsp dry Chia Seeds
1 TBSP Peanut Butter
1 tsp Honey
1/4 C diced ripe Banana
Fresh Blueberries to fill up the jar
Half Pint mason jars with lids and rings

Add the Oats, Chia Seeds, Yogurt, Honey, Peanut Butter, Bananas, and Blueberries to the mason jar.  Then add in the Milk and top the jar with the lid and ring.  Shake the contents well to thoroughly combine the ingredients.  Place in the refrigerator overnight and enjoy the next morning.

Enjoy!


Now time for our next Giveaway!!


 Blog-a-pal-oosa


I am loving all of these fun giveaways!  I just wish I could win each and every one of them.  Remember to check back here every day for the next giveaway.  I can't believe it is day 4 already!  I am excited to announce that Jennifer from Making my Way in Texas is giving away...

a $20 credit to her online store LoneStar Lovlies LONESTAR banner


Check out her blog to enter the giveaway and you will also find a discount code to the store.  


She is also giving away a super cute Gold Fish Pouch

Zipper Pouch Goldfish
Head on over the Finding My Way in Texas to enter! 

Don't forget to check out the previous giveaways:
1.  Bling flig flops and cute bag  
2.  Kids apron, chef hat, and Recipe Cards 
3.  $20.00 Amazon Giftcard

Also..while you are here don't forget to check out the Chicken Alfredo baked pasta recipe I posted last year.
Pin It