December 3, 2013

Eggplant with Lemon Zest Ricotta Recipe

Pin It
The holidays are here!  I can't believe Thanksgiving has passed and Christmas is knocking at my door.  It snowed, a lot, today.  My older kids were so excited to put on their snow suits and play in the white fluffy stuff.  My oldest loves to build castles, forts, and other structures.  The trouble is, that she usually insists on building them in my driveway...not the most convenient spot if you ask me.

My oldest building driveway obstructions.


My middle child eating snow and playing with our snow beast.
My family doing a turkey trot Thanksgiving morning.

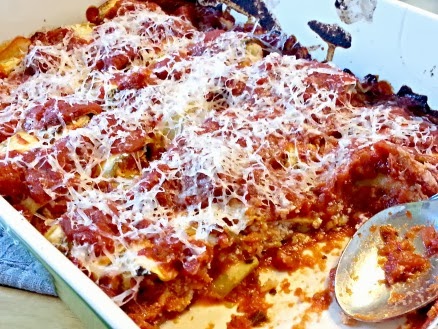
Now back to the subject at hand...food!  Not just food, but really super good food.  I found this tasty delight here and boy am I glad I did!  I have whipped up this dish twice and I love the flavor combo.  To try and save a few calories I decided to roast the Eggplant rather than fry it.  My kids weren't thrilled with the Eggplant skin so the second time I made the dish I cut off the skin.  Give it a try when you have an eggplant or two just hanging around.

You will need Panko Bread Crumbs, Parmesan Cheese, Lemon, Marinara, Thyme, Eggplant, Ricotta Cheese, and a Mandolin slicer.  You could probably get by without the Mandolin...but it sure makes things easy.

This recipe takes a little prep to try and extract the liquid in the Eggplant but it is so worth it!

The filling is so lemony and delightful.  I could probably just eat it with a spoon.

I used jarred Marinara but you could make your own to up the awesome.

Enjoy!!


Eggplant with lemon Zest Ricotta Recipe
Source:  Alexandra's Kitchen

1 Eggplant
Salt
Marinara Sauce
1/2 C Panko Bread Crumbs
1 C Ricotta Cheese
1 Lemon, all the Zest and 1/2 the Juice
1 tsp Thyme
Grated Parmesan Cheese
Salt & Pepper to taste

Pre-heat oven to 350 degrees.

Slice the Eggplant thinly lengthwise with a Mandolin slicer.  Sprinkle both sides with a bit of salt and let sit in a colander over a sink for about 30 minutes.  This will draw out excess moisture and help them to roast up nicely.  Use a paper towel to get off moisture and excess salt.  Place on a baking sheet and sprinkle with a little olive oil.  I used my Misto and gave them a light spraying.  Roast for about 20 minutes, or until they are tender.  Check at 15 minutes because they go from good to crispy pretty quickly.  Allow them to cool.

Pre-heat oven to 450 degrees

In a Bowl mix together the Lemon Zest, Lemon Juice, Ricotta Cheese, Panko Bread Crumbs, Thyme, and a bit of Salt & Pepper.  Lightly cover the bottom of a baking dish with Marinara Sauce.  Place a Heaping spoonful of the Ricotta mixture on one end of the Eggplant and roll it up.  Place seam side down in the baking dish.  Top with More Marinara and a good sprinkling of Parmesan Cheese.  Bake for 20-25 minutes.

Enjoy!


Pin It

October 28, 2013

Jello Worms Recipe great for Halloween!

Pin It
Do you have a Halloween Party coming up?  Do you want to have the spookiest, creapiest, crawliest dessert of all?  Then have I got a treat for you!  I made this the other day for my work's Halloween party and I won $$ for having the spookiest dessert of all.  These Jello worms are so awesome and  worm-like that it is just a bit on the foul side.  They wiggle and squirm just like a worm would.

You will need 100 bendy straws with the bendy parts extended
You need a package of red Jello..most of the recipes call for Raspberry, but I was a rebel and got Dark Cherry.
You also need 3 packets of unflavored Gellatin to amp up the firmness..nobody wants a soggy worm.
You need about 1/3 Cup of Heavy Cream
Then add in about 14 drops of food coloring.  I used a gel coloring and sadly added too much and my worms went green and weren't too wormy.  Then I decided to do some orange ones for contrast.


Put the Jello and extra Gellatin in a large bowl and mix in 3 Cups of Boiling water.  Whisk together well until everything is melted and combined.  Then let the mixture cool for a bit.  I stuck mine in the fridge for about 15 minutes or so.

Then add in the Cream.  You can either mix well to get a good and cloudy colored worm..or mix gently for a more marbled look. 


Stick the straws with the bendy part on the bottom and place a rubber band around the top and bottom.  Then place them in a tall but narrow container.  I used a drinking glass.  Pour in a little bit of the jello...not too much.  Place the glasses in the fridge for about 20 minutes to get a good solid base started.


After the 20 pour in the rest of the Jello and let sit overnight.

The next morning you will have a gelatinous mound of goo in your glass.  Use a butter knife or something to help get it out.  Peel off the excess Jello and run the straws under slightly warm water to clean them off.


There are several ways to get them out of the straws..but the best way is to use a rolling pin.  Just pop 3 of the straws on the counter..steamroll over them with the rolling pin and watch the creepy worms just squiggle on out.

Believe me when I say that trying to get them out by hand SUCKS!  They are slippery..messy..gooey..and just plain hard to hold onto.  You can always go the pliers route..but the rolling pin is by far the best!


Make sure you wiggle them like a good worm as you eat them.  It makes it feel a bit more real...

 Enjoy as you take in the glory of your wormy dessert.  Praises and prizes galore!


Source:  Mel's Kitchen Cafe

Pin It

October 24, 2013

Easy and Spooky Spider Cookies

Pin It
I love holiday baking!  And, if you ask me holiday baking starts in October.  Yep, Halloween is a very bakeable holiday in my opinion.  There are so many fun and ghoulish things that you can bake up.  The other day I was cruising my blogging buddies page and saw these creepy crawly spider cookies.

I decided to give it a whirl with my older kids and we had a blast making (and eating) these scary spiders.  I found that my chocolate chips weren't melty enough to draw on the legs so I just melted a few left over chips and used that to create the spooky legs.


Halloweeny and perfect!  Whip them up and creep out all your friends. Pin It