Showing posts with label decorating. Show all posts

October 28, 2013

Jello Worms Recipe great for Halloween!

Pin It
Do you have a Halloween Party coming up?  Do you want to have the spookiest, creapiest, crawliest dessert of all?  Then have I got a treat for you!  I made this the other day for my work's Halloween party and I won $$ for having the spookiest dessert of all.  These Jello worms are so awesome and  worm-like that it is just a bit on the foul side.  They wiggle and squirm just like a worm would.

You will need 100 bendy straws with the bendy parts extended
You need a package of red Jello..most of the recipes call for Raspberry, but I was a rebel and got Dark Cherry.
You also need 3 packets of unflavored Gellatin to amp up the firmness..nobody wants a soggy worm.
You need about 1/3 Cup of Heavy Cream
Then add in about 14 drops of food coloring.  I used a gel coloring and sadly added too much and my worms went green and weren't too wormy.  Then I decided to do some orange ones for contrast.


Put the Jello and extra Gellatin in a large bowl and mix in 3 Cups of Boiling water.  Whisk together well until everything is melted and combined.  Then let the mixture cool for a bit.  I stuck mine in the fridge for about 15 minutes or so.

Then add in the Cream.  You can either mix well to get a good and cloudy colored worm..or mix gently for a more marbled look. 


Stick the straws with the bendy part on the bottom and place a rubber band around the top and bottom.  Then place them in a tall but narrow container.  I used a drinking glass.  Pour in a little bit of the jello...not too much.  Place the glasses in the fridge for about 20 minutes to get a good solid base started.


After the 20 pour in the rest of the Jello and let sit overnight.

The next morning you will have a gelatinous mound of goo in your glass.  Use a butter knife or something to help get it out.  Peel off the excess Jello and run the straws under slightly warm water to clean them off.


There are several ways to get them out of the straws..but the best way is to use a rolling pin.  Just pop 3 of the straws on the counter..steamroll over them with the rolling pin and watch the creepy worms just squiggle on out.

Believe me when I say that trying to get them out by hand SUCKS!  They are slippery..messy..gooey..and just plain hard to hold onto.  You can always go the pliers route..but the rolling pin is by far the best!


Make sure you wiggle them like a good worm as you eat them.  It makes it feel a bit more real...

 Enjoy as you take in the glory of your wormy dessert.  Praises and prizes galore!


Source:  Mel's Kitchen Cafe

Pin It

October 24, 2013

Easy and Spooky Spider Cookies

Pin It
I love holiday baking!  And, if you ask me holiday baking starts in October.  Yep, Halloween is a very bakeable holiday in my opinion.  There are so many fun and ghoulish things that you can bake up.  The other day I was cruising my blogging buddies page and saw these creepy crawly spider cookies.

I decided to give it a whirl with my older kids and we had a blast making (and eating) these scary spiders.  I found that my chocolate chips weren't melty enough to draw on the legs so I just melted a few left over chips and used that to create the spooky legs.


Halloweeny and perfect!  Whip them up and creep out all your friends. Pin It

December 12, 2012

Nutter Butter Cookie Balls Recipe

Pin It
Cookies!  Oh yeah..I said cookies!  Every year my sister and I put together a Christmas Cookie Exchange party.  It is so much fun and we get to sample all kinds of yummy cookies.  I like to try something new and exciting every year.  Some of my treats have been awesome..while others have been less than awesome.  But it's all in good fun so I don't mind the flops.  This year I was cruising the web and saw this little beauty and just had to give it a try.  Crumbled up cookies in a cookie!?  What could be tastier?


You will need Mini Nutter Butter Bites, Nutter Butter Cookies, Peanut Butter (I used creamy), Softened Cream Cheese (I used the diet stuff), and Almond Bark.

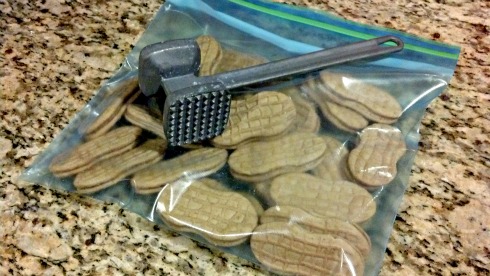
Put the regular Nutter Butter Cookies in a zip top bag and using your meat club crush those babies up.  I did this shortly after putting my children to bed and my crushing woke up my 2 year old.  Perhaps next time I'll crush more gently.

Mix together the soft Cream Cheese and crushed Nutter Butters.

It will come together in a kind of dry and slightly crumbly mixture.


Roll into little balls.  I got just over 2 dozen of them.  Refrigerate at least one hour.  I let them sit overnight.


Grab a handful or two of the Nutter Butter Bites and cut them in half.

In a microwave safe dish (I find a measuring cup works best) place the Almond Bark and Peanut Butter in the microwave.  At 50% power microwave in 30 second increments, stirring after each, until everything is melted and combined.

Prepare your station.  Rolled balls on one sheet.  Melted PB goodness in the middle.  Clean sheet covered with parchment on the other side.  Cut up Mini Nutters close by.
Drop one ball at a time in the melted PB mixture.  Using a fork lightly tap on the dish to remove excess chocolatey goo.

Place the coated ball on the clean cookie sheet.

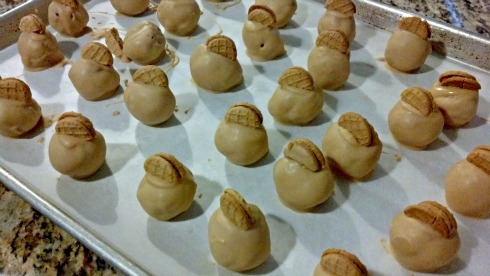
Top wit a mini Nutter.  Repeat until they are all coated and topped.  Allow plenty of time for coating to harden.  You can also place them in the fridge to hurry this process along.

Enjoy!


Nutter Butter Cookie Balls Recipe
Source:  Kraft Recipes

1 8oz package Softened Cream Cheese
24 Nutter Butter Cookies, crushed
3-6 Squares Almond Bark 
1/4 C Creamy Peanut Butter
Mini Nutter Butter Cookies cut in half
 
Mix together the crushed Nutter Butter Cookies and soft Cream Cheese to make a slightly crumbly dough.  Roll the dough into 1 inch balls.  I ended up with just over 2 dozen.  Place on a baking sheet covered with plastic wrap and refrigerate at least 1 hour.  

In a microwave safe dish mix, add the Peanut Butter and Almond bard.  Microwave in 30 second increments at 50% power until everything is melted and combined.  Make sure to stir after every 30 seconds.  Drop the Balls, one at a time, into the Melted PB mixture.  Using a fork, tap lightly on the dish to remove excess coating.  Place on a parchment lined baking sheet and top with one of the mini Nutter Butter halves.  Once all the balls are coated allow the coating to set.

Enjoy!   Pin It

March 29, 2012

Despicable Me Minion Cupcakes Tutorial

Pin It
My oldest daughter recently celebrated her Fourth Birthday!  I cannot believe my baby has gotten so big.  It breaks my heart just a little bit that time is flying by so quickly.  I like making cupcakes for Birthday parties.  I like decorating them but I don't usually have the patience to do anything too elaborate.  I saw this picture on Pinterest and knew I had found a winner.  My daughter has loved "Despicable Me" since she first saw it.  She especially loves the Minions.  These were a huge party hit!  All the kids thought they were cool and couldn't wait to eat a Minion.


You will need Twinkies, Smarties, Brown sprinkles (or Jimmies I found mine at Michaels), Black Writing Icing, and Frosted Cupcakes.

Cut the Twinkies in half and place one half on top of each Cupcake with the cut side down.

Put 2 or 3 of the Sprinkles right into the top of the Twinkie as the Minion's hair.
Using the Black Writing Icing But two dots where the eyes should be.  Then put a Smarties over each one.  You don't need too much icing to get them to stick but you want to have enough to get them to stick.  Then put two dots on the Smarties to finish the eyes.  Then draw on a mouth and the straps for the goggles.


Don't they look like happy little Minions?

The party guests loved them!

Enjoy!

Minion Cupcakes Tutorial
Source: Party Tip Junkie

Frosted Cupcakes
Smarties
Brown Sprinkles
Black Writing Icing

Cut the Twinkies in half and place them one half on top of each frosted cupcake cut side down.  Pick through the Smarties for same colors.  I used the Whites, Yellows, and Greens.  Put two dots of writing icing on each Twinkies half where you want to put the Smarties.  Then place on the Smarties and put a dot on each to finish the eyes.  Draw on a mouth and straps for the Goggles.  Grab two or three of the brown Sprinkles and place them in the straight into the top of the head for the hair.

Enjoy! Pin It

November 16, 2011

Marshmallow Flower Cupcakes Recipe

Pin It
I wanted to make some really fun and girly cupcakes for my daughters first Birthday.  No big deal that most of the theme for the party was Halloween.  I found this super fun flower cupcake topper idea.  It was so easy, came together quickly, and turned out absolutely perfectly! My baby devoured the whole thing in no time flat.  She was so cute eating the cupcake and I was happy that I had made something so cute for her special day.


You will need frosted cupcakes, Mini Marshmallows, Kitchen scissors, Colored Sugar sprinkles, and Something to use as the center of the flower.  The Mint Chocolate chips tasted good and looked super cute but Mini M&M's would work well too.
Put the Colored Sugar Sprinkles in separate spots.  This plate worked great..too bad it didn't have enough spots for all my colors.

Cut the Marshmallows on the diagonal with the kitchen scissors. 

You can drop them right in the colored Sugar sprinkles. 
The cut side is good and sticky so the Sugar Sprinkles stick to them really well.  I would press down on them a bit to make sure they got good and covered with the sugar.

Place the Mint Chocolate chip (or whatever you are using) down in the middle of the cake.  Surround it with the cute little petals you made.

These are so much fun!  I also made a rainbow flower that isn't pictured and my niece was so excited about that one.

Enjoy!


Marshmallow Flower Cupcakes Recipe
Source:  Kitchen Daily - Karen Tack & Alan Richardson & Hello, Cupcake! 

Frosted Cupcakes
Mini Marshmallows
Mint Chocolate Chips
Colored Sugar Sprinkles

Cut the Marshmallows on the diagonal and drop into the sugar crystals.  Press the cut/sticky side down into the sugar crystals to ensure it gets fully covered.  Place a Mint Chocolate Chip in the middle of the frosted cupcake.  Surround it by the Mallow petal halves.

Enjoy! Pin It