Showing posts with label Peanut Butter. Show all posts

October 8, 2013

Oven Peanut Butter S'mores Recipe

Pin It
I love nothing better than a fun night out in the canyon with good friends.  Hot dogs cooked over an open fire pit, kids running around getting filthy, having to bum salt from the guys next to you cause ya'll forgot yours, and the s'mores!  Oh yes, the s'mores!  They weren't kidding when they named those beauties s'mores..cause you always want s'more!

Alas, you don't always find yourself in the canyon when the craving for a tasty, toasty, melty s'more arises.  So what do you do?!  Check this baby out and you'll never be hungry again!  Or at least you can curb a craving quickly and easily.


You will need Graham Crackers, Peanut Butter, Marshmallows, and Chocolate Chips (I used semi sweet)

Get your awesome and absolutely adorable helper to pitch in on this recipe.  Just have her slather those Grahams with Peanut Butter.  Excellent..that looks great!

Hey now!  what do you think you are doing?  Get back to work.

Next have your helper place a few Marshmallows on each graham.  Nicely done!

What?!  Wait!  This is a serious food blog..there is no room for tomfoolery!

Excellent, let's focus on the food!  Place a few chocolate chips here and there amongst the Mallows.

Place them on a parchment lined cookie sheet and put in the oven under a warm broiler...but be careful!  These cook up very quickly...usually in a minute or so.  Just keep your eyes peeled because one second they aren't done and the next they are darker than you want!


Enjoy..Just like my kids did!


Oven Peanut Butter S'mores Recipe

Graham Crackers
Peanut Butter
Marshmallows
Chocolate Chips

Pre-heat the oven's broiler.  Spread PB on the Grahams then top with Marshmallows and chocolate chips.  Place in oven on a parchment lined baking sheet... but watch very closely because these go from not done to over done very quickly.  Takes about a minute or so to toast the Mallows.

Enjoy! Pin It

March 25, 2013

peanut Butter & Chocolate No Bake Cookies Recipe

Pin It
When I was a kid there was nothing better than a no bake cookie.  My Mom never made them to my chagrin.  But lucky for me my friend's older sisters made them all the time!  Wahoo!  As an adult I've only made them twice..which is funny to me considering how much I liked them.  It turns out that even though you don't have to bake them you do still have a bit of stove top time and some cooling/hardening time.  This recipe turned out so yummy.  I made them for my daughter's tea party with her cousins.  We didn't even let them cool before we indulged in them.  Give them a try when you have a bunch of kids wanting a tea party.  Or any time for that matter.


You will need Milk, Butter, Cocoa, Sugar, Peanut Butter, and Oats.  Also Vanilla..poor vanilla missed the shot.
Add the Butter, Sugar, and cocoa to a sauce pan and warm over Medium heat.  Add in the Milk & Vanilla and bring the whole mixture to a boil.
Once you are Boiling add in the Oats and Peanut Butter.  Mix together well.
Grab a bit of parchment paper and place dollops of the mixture out to dry.  You can make them as big or small as you want.  Wait until the cool and become hardened...if you can!  Bwahaha!  Ha...ha.  Enjoy!

Peanut Butter & Chocolate No Bake Cookies Recipe
Source:  Food Network

2 C Sugar
4 TBSP Cocoa
1 Stick Butter
1/2 C Milk
1 C Peanut Butter
1 TBSP Vanilla
3 C Oats

Combine the Sugar, Cocoa, Butter, and Milk in a saucepan over Medium heat.  Bring the mixture to a boil.  After about a minute or so add in the Peanut Butter, Vanilla, and Oats.  Mix together well.  Spread out a bit of Parchment Paper on your counter and drop the mixture by the spoonful to cool/harden.  Enjoy! Pin It
December 12, 2012

Nutter Butter Cookie Balls Recipe

Pin It
Cookies!  Oh yeah..I said cookies!  Every year my sister and I put together a Christmas Cookie Exchange party.  It is so much fun and we get to sample all kinds of yummy cookies.  I like to try something new and exciting every year.  Some of my treats have been awesome..while others have been less than awesome.  But it's all in good fun so I don't mind the flops.  This year I was cruising the web and saw this little beauty and just had to give it a try.  Crumbled up cookies in a cookie!?  What could be tastier?


You will need Mini Nutter Butter Bites, Nutter Butter Cookies, Peanut Butter (I used creamy), Softened Cream Cheese (I used the diet stuff), and Almond Bark.

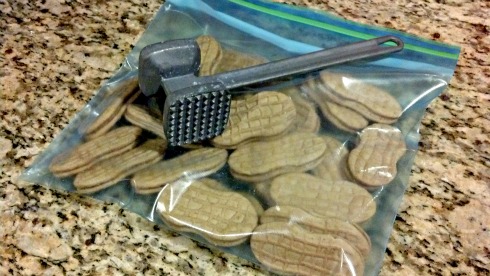
Put the regular Nutter Butter Cookies in a zip top bag and using your meat club crush those babies up.  I did this shortly after putting my children to bed and my crushing woke up my 2 year old.  Perhaps next time I'll crush more gently.

Mix together the soft Cream Cheese and crushed Nutter Butters.

It will come together in a kind of dry and slightly crumbly mixture.


Roll into little balls.  I got just over 2 dozen of them.  Refrigerate at least one hour.  I let them sit overnight.


Grab a handful or two of the Nutter Butter Bites and cut them in half.

In a microwave safe dish (I find a measuring cup works best) place the Almond Bark and Peanut Butter in the microwave.  At 50% power microwave in 30 second increments, stirring after each, until everything is melted and combined.

Prepare your station.  Rolled balls on one sheet.  Melted PB goodness in the middle.  Clean sheet covered with parchment on the other side.  Cut up Mini Nutters close by.
Drop one ball at a time in the melted PB mixture.  Using a fork lightly tap on the dish to remove excess chocolatey goo.

Place the coated ball on the clean cookie sheet.

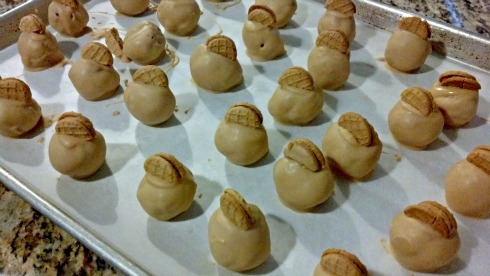
Top wit a mini Nutter.  Repeat until they are all coated and topped.  Allow plenty of time for coating to harden.  You can also place them in the fridge to hurry this process along.

Enjoy!


Nutter Butter Cookie Balls Recipe
Source:  Kraft Recipes

1 8oz package Softened Cream Cheese
24 Nutter Butter Cookies, crushed
3-6 Squares Almond Bark 
1/4 C Creamy Peanut Butter
Mini Nutter Butter Cookies cut in half
 
Mix together the crushed Nutter Butter Cookies and soft Cream Cheese to make a slightly crumbly dough.  Roll the dough into 1 inch balls.  I ended up with just over 2 dozen.  Place on a baking sheet covered with plastic wrap and refrigerate at least 1 hour.  

In a microwave safe dish mix, add the Peanut Butter and Almond bard.  Microwave in 30 second increments at 50% power until everything is melted and combined.  Make sure to stir after every 30 seconds.  Drop the Balls, one at a time, into the Melted PB mixture.  Using a fork, tap lightly on the dish to remove excess coating.  Place on a parchment lined baking sheet and top with one of the mini Nutter Butter halves.  Once all the balls are coated allow the coating to set.

Enjoy!   Pin It

May 9, 2012

Overnight PB, Banana, & Blueberries Oatmeal Recipe and Giveaway # 4

Pin It
We eat a lot of oatmeal at my house.  It is one of my favorite go to breakfasts with a bit of raisins and pecans added in.  Lately I have been seeing lots and lots of overnight refrigerator oats online.  Oats that don't require cooking?  Oats that soften and taste good after a night in the fridge?  Oats without Raisins or Pecans?  This sounded a bit strange but also crazy delicious.  The more I saw online the more I had to try it.  So I did..and my husband and I loved it.  The kids didn't go for this flavor much but I think they would like it if it had been a bit sweeter.  I will absolutely be trying this again and playing around with different flavors.  I really liked having the Chia Sees in the mixture.  Very good.   I found the recipe here and made a few little changes of my own. 

You will need Old Fashioned Oats, Ripe Bananas, Peanut Butter, Half Pint Jars, Blueberries, Yogurt, Honey, Chia Seeds, and Milk.


Add the Oats and Chia seeds to the Half Pint Jar.

Next add in the Yogurt and Honey.

Add in a good scoop of Peanut Butter.
Then add sliced Bananas and fresh Blueberries.


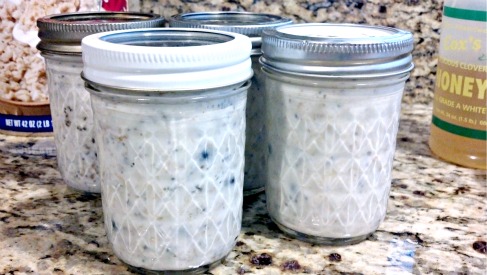
Pour in some Milk and put the lid and ring on the jar.

Then shake, shake, shake the jar.  I also gave the contents of the jar a good stirring because  a bit of the honey stuck to the side and didn't want to mix in.  Pop in the fridge and let sit overnight. 
The next morning give the jar another little shake.  Take off the lid and top with a few fresh Blueberries.  Add a little honey for added sweetness.


Yum!  Enjoy!
My tiny one wouldn't let the spoon get any closer to her mouth than this.  Little stinker wouldn't even give it a try!

My oldest tried a few bites but in the end chose to eat Krave Cereal instead.


Overnight PB, Banana, & Blueberries Oatmeal Recipe per jar
Source:  The Yummy Life

1/4 C Old Fashioned Oats, uncooked
1/3 C Milk
1/4 C lowfat Yogurt (I used plain Fage Greek yogurt)
1 1/2 tsp dry Chia Seeds
1 TBSP Peanut Butter
1 tsp Honey
1/4 C diced ripe Banana
Fresh Blueberries to fill up the jar
Half Pint mason jars with lids and rings

Add the Oats, Chia Seeds, Yogurt, Honey, Peanut Butter, Bananas, and Blueberries to the mason jar.  Then add in the Milk and top the jar with the lid and ring.  Shake the contents well to thoroughly combine the ingredients.  Place in the refrigerator overnight and enjoy the next morning.

Enjoy!


Now time for our next Giveaway!!


 Blog-a-pal-oosa


I am loving all of these fun giveaways!  I just wish I could win each and every one of them.  Remember to check back here every day for the next giveaway.  I can't believe it is day 4 already!  I am excited to announce that Jennifer from Making my Way in Texas is giving away...

a $20 credit to her online store LoneStar Lovlies LONESTAR banner


Check out her blog to enter the giveaway and you will also find a discount code to the store.  


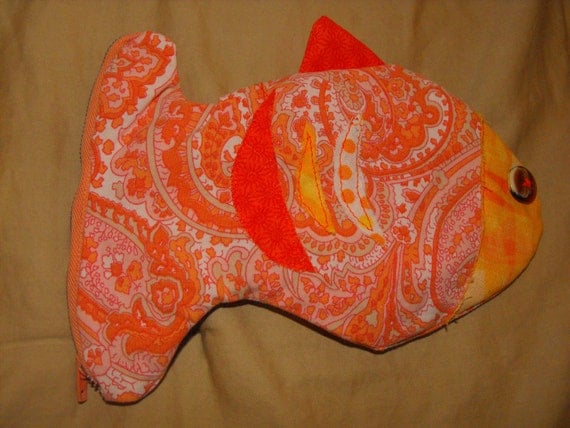
She is also giving away a super cute Gold Fish Pouch

Zipper Pouch Goldfish
Head on over the Finding My Way in Texas to enter! 

Don't forget to check out the previous giveaways:
1.  Bling flig flops and cute bag  
2.  Kids apron, chef hat, and Recipe Cards 
3.  $20.00 Amazon Giftcard

Also..while you are here don't forget to check out the Chicken Alfredo baked pasta recipe I posted last year.
Pin It

April 23, 2012

Peanut Butter & White Chocolate Rice Krispies Treat Recipe

Pin It
Have I got a yummy treat for you today.  I saw this little gem and just had to give it a try. Luckily for me my neighbor had just come home with her adorable new born baby and was in need of a tasty supper.  I whipped up a some delicious Chili Lime Enchiladas and a batch of these White Chocolate & Peanut Butter krispies for dessert.  Boy was I glad I tried these because they were amazing.  They came together quickly and easily and I only had to use my microwave to melt the chocolate.  Whip these up right away because you are going to love them.


You will need Mini Marshmallows, Mini Chocolate Chips, White Chocolate Chips, Peanut Butter, and Rice Krispies.

Slowly melt the chocolate in a microwave safe dish.  I started by lowering the power to 50% and went for 1 minute, stirred, and then nuked in 30 second increments.  Make sure to stir between each nuking. 

Add the Peanut Butter into the melted White Chocolate

and mix it all together well.  At this point you should probably enjoy a little taste..just to make sure it is as good as you imagine it is.

Add the Rice Krispies in with the White Chocolate/PB mixture.  This dish was too small so I actually moved it to a bigger dish when I realized that mixing without spilling was impossible.

Add in the Mini Mallows and the Mini Chocolate Chips and mix together well but gently.

Spray a 9x9 dish with non-stick spray.

Then add the mixture and gently press down.  No need to crush it..just press a bit.

Top with a few extra Mini Chocolate Chips and let it set up for an hour or two.  When the chocolate has hardened cut them up.

Make sure to take some to your neighbor who is in desperate need of a meal. 


Then you can enjoy one for yourself.


Peanut Butter & White Chocolate Rice Krsipies Treat Recipe
Source:  Cookies and Cups

12 oz Bag White Chocolate Chips
1/2 C Creamy Peanut Butter
3 C Rice Krispies Cereal
1 1/2 C Mini Marshmallows
1/4 C Mini Chocolate Chips plus a bit extra for Garnish

Lightly spray a 9x9 dish with non-stick cooking spray.

Using a microwave safe bowl melt the White Chocolate Chips in the microwave.  Set the power to 50% and start by setting the time to 1 minute.  Stir the Chocolate and stick back in continuing to use 50% power in 30 second increments until the Chocolate is fully melted.  Be careful to stir well between each use of the microwave.  You don't want to over melt the Chocolate or it will turn out hard and weird.

Once the Chips are fully melted add in the Peanut Butter and mix together really well.  In a large bowl add the Rice Krispies, Mini Chocolate Chips, and Mini Marshmallows.  If the Chocolate mix is really warm you may want to wait a few before you add in the highly meltables but I just threw them right in.  Mix everything together gently but thoroughly.

Transfer the Krsipies mixture to the dish and press it down gently.  No need to press too hard and crush everything together.  Sprinkle a TBSP or two of the Mini Chocolate Chips on top pressing them down a bit to make them look very pretty.  Allow them to cool for an hour or two. 

Cut into treats and Enjoy. Pin It

October 29, 2011

Hungry Girl Peanut Butter Fudge Recipe

Pin It
I was watching an episode of Hungry Girl where she made Peanut Butter Fudge using some of the most intriguing ingredients I have ever seen before.  With only Pumpkin Puree, boxed Brownie mix, and Peanut butter she made a very low cal dessert.  I was on it!  Seeing as pumpkin is a favorite ingredient of mine and low cal desserts being awesome I had to try it.  She also used some sugar free chocolate syrup, which I bought for the recipe but forgot to use.  I actually looked up 2 of her recipes online and the one I was looking at didn't list the syrup.  So next time I'll use the syrup and see if it changes things.  The recipe suggests that you let the fudge fully cool before eating and I suggest you follow that step.  The fudge has a different texture and for some reason it doesn't really work warm.  I don't know that I would call this fudge because it didn't remind me of fudge much.  It is a dense cake with a pumpkiny chocolate flavor.  My family liked it and so did my brother-in-law.  My sister however didn't like it at all.  I figure it is what it is..a low cal treat that hits the spot.  But if you are looking for something that is truly like fudge this is not for you.


You will need Betty Crocker Fudge Brownies mix (Hungry Girl suggested this product specifically so I listened.), Pumpkin Puree, and Peanut Butter.

In a large bowl add the Brownies Mix and Pumpkin Puree.

Mix it all together well.  It seems a bit odd but it comes together pretty quickly.

Spray an 8x8 pan well with non-stick spray.

Add in the fudge mixture.

Dollop the PB on top.  She suggests you nuke the PB a bit to get it soft and easy to work with.  But I couldn't be bothered to do that and dirty another dish.

Using a knife (My rubber spatula was a bit too big so next time I'll use a knife) make a swirly pattern incorporating the PB.

Pretty.  Now bake the mixture at 350 degrees for 35 minutes.

Allow this to cool at room temperature for a little while.

When it is cool enough to go in the fridge cover it with foil.

Place it in the fridge and let it cool for at least 2 hours.  You can be like me and try it early..but I promise it is better cold.

Enjoy!


Hungry Girl Peanut Butter Fudge Recipe
Source:  Food Network - Hungry Girl

1 box Betty Crocker Fudge Brownie Mix
2 C Canned Pumpkin Puree
2 TBSP Peanut Butter

Mix the Brownie Mix and Pumpkin together well in a large bowl.  (If you want to add the Chocolate Syrup now is the point you will want to do that.  2 TBSP of sugar free chocolate syrup and just add it into the mix.) Spray an 8x8 or 9x9 pan with non-stick spray.  Add the brownie mix.  Dollop the Peanut Butter on top in various spots.  Then using a knife create a swirly pattern or pattern of your choice.

Preheat oven to 350 degrees and bake 35 minutes.  Once cooking is finished allow the fudge to cool at room temp for 20 minutes or until it is cool enough to go in the fridge.  Cover with foil and set in fridge for 2 hours.  Cut into pieces and Enjoy!

Approximately 24 servings

100 Calories
21 Carbs
2 Fat
1 Protein Pin It