December 29, 2012

Ham Roll Appetizer Recipe

Pin It
Have I mentioned that I am less than 3 weeks away from having my third child!  This is so crazy to me.  I am so not ready...is it possible to request more time?  Although, with how uncomfortable I am maybe I am ready after all.  Such a shame that things get so crowded at the end of pregnancy.  I was remembering back to when I had my first child recently.  One of the funnier memories involves a delicious appetizer and my baby shower.

My Mom and sister threw me a very sweet baby shower and you should have seen the spread of food they prepared.  It was fantastic in every way.  There was so much amazing and delectable treats that it was hard to choose what to snack on.  They made on of my favorites..Ham Rolls!  They are always so yummy and a bonus they are pretty low calorie.  I must have gobbled down a dozen ham rolls, at least.  After the party was over I peeked in the fridge and found that the ham that I had bee consuming all afternoon had expired!!!  Not just by a day or two either.  It was horrible!  Luckily nobody got sick and my sister decided to always check the expiration date when shopping at the Walmart.  You should give these babies a try when you have a party to go to.  Perfect any time of year and in any setting. 


You will need Cream Cheese (the whipped kind spreads more easily), Ham, and Green Onions.
Grab a slice of Ham.

Spread the Cream Cheese almost to the edges of the Ham.
Slice the Green Onion up. 
Evenly sprinkle a little Green Onion over the meat.

Roll the ham up.
Slice into little rolls and Enjoy!


Ham Roll Appetizer Recipe

Ham
Cream Cheese
Green Onion

Evenly spread a TBSP or so of the Cream Cheese over the top of the Ham slice.  Chop the Green Onion up into little slices and sprinkle over the top of the Cream Cheese.  Roll the ham up and slice into mini rolls. 

Enjoy! Pin It

December 12, 2012

Nutter Butter Cookie Balls Recipe

Pin It
Cookies!  Oh yeah..I said cookies!  Every year my sister and I put together a Christmas Cookie Exchange party.  It is so much fun and we get to sample all kinds of yummy cookies.  I like to try something new and exciting every year.  Some of my treats have been awesome..while others have been less than awesome.  But it's all in good fun so I don't mind the flops.  This year I was cruising the web and saw this little beauty and just had to give it a try.  Crumbled up cookies in a cookie!?  What could be tastier?


You will need Mini Nutter Butter Bites, Nutter Butter Cookies, Peanut Butter (I used creamy), Softened Cream Cheese (I used the diet stuff), and Almond Bark.

Put the regular Nutter Butter Cookies in a zip top bag and using your meat club crush those babies up.  I did this shortly after putting my children to bed and my crushing woke up my 2 year old.  Perhaps next time I'll crush more gently.

Mix together the soft Cream Cheese and crushed Nutter Butters.

It will come together in a kind of dry and slightly crumbly mixture.


Roll into little balls.  I got just over 2 dozen of them.  Refrigerate at least one hour.  I let them sit overnight.


Grab a handful or two of the Nutter Butter Bites and cut them in half.

In a microwave safe dish (I find a measuring cup works best) place the Almond Bark and Peanut Butter in the microwave.  At 50% power microwave in 30 second increments, stirring after each, until everything is melted and combined.

Prepare your station.  Rolled balls on one sheet.  Melted PB goodness in the middle.  Clean sheet covered with parchment on the other side.  Cut up Mini Nutters close by.
Drop one ball at a time in the melted PB mixture.  Using a fork lightly tap on the dish to remove excess chocolatey goo.

Place the coated ball on the clean cookie sheet.

Top wit a mini Nutter.  Repeat until they are all coated and topped.  Allow plenty of time for coating to harden.  You can also place them in the fridge to hurry this process along.

Enjoy!


Nutter Butter Cookie Balls Recipe
Source:  Kraft Recipes

1 8oz package Softened Cream Cheese
24 Nutter Butter Cookies, crushed
3-6 Squares Almond Bark 
1/4 C Creamy Peanut Butter
Mini Nutter Butter Cookies cut in half
 
Mix together the crushed Nutter Butter Cookies and soft Cream Cheese to make a slightly crumbly dough.  Roll the dough into 1 inch balls.  I ended up with just over 2 dozen.  Place on a baking sheet covered with plastic wrap and refrigerate at least 1 hour.  

In a microwave safe dish mix, add the Peanut Butter and Almond bard.  Microwave in 30 second increments at 50% power until everything is melted and combined.  Make sure to stir after every 30 seconds.  Drop the Balls, one at a time, into the Melted PB mixture.  Using a fork, tap lightly on the dish to remove excess coating.  Place on a parchment lined baking sheet and top with one of the mini Nutter Butter halves.  Once all the balls are coated allow the coating to set.

Enjoy!   Pin It

November 29, 2012

Shepherd's Pie with mashed Parmesan Butternut Squash

Pin It
I've always loved the Backstreet Boys.  Seriously loved them.  Not like stalker kind of love..just fan that buys your CD's, goes to your show, and buys merch kind of love.  For some reason this blog today reminds me of the "Backstreet's Back" song.  Sure..the fact that I haven't written anything since September might have a little something to do with that.  But..I've been..well..gosh where to start?  I've had a few surprises in my life over the last 6 months or so.  I found out that I am pregnant with my third child.  My surprise baby is due in about 6 weeks!  We are having..another girl and couldn't be more excited. 

But enough about my crazy life..let's get to the good stuff.  A few weeks ago I cooked up the yummiest Shepherd's pie on the planet.  Instead of a mashed potato topping I used  a decadent mashed Parmesan Butternut Squash!  The topping was so delectable that I made it as a side dish for Thanksgiving Dinner.  This is the perfect dinner for a cold night.  It really sticks to your ribs and warms you up right.  Give it a try soon...but try not to eat all the mash before dinner is ready.

You will need Worcestershire Sauce, Beef Broth, Mushrooms, Rosemary, Canola Oil, Parmesan Cheese, Frozen Peas & Carrots, Crushed Tomatoes, Onion, Garlic, Butternut Squash, Butter, Sweet Italian Sausage, and Salt & Pepper.

Peel, de-seed, and chop up the Butternut Squash.

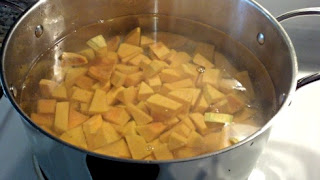
Toss the Squash into a big pot full of lightly salted boiling water and cook until they are tender.  The smaller the chunks the quicker this will happen.

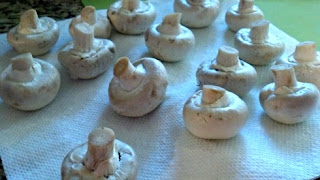
You can do as I do here..or do as you do.  I always wash my Mushrooms under a gently running tap and let dry on a paper towel.  I know they always say to just rub any visible dirt off.. but I just have to wash them.

Warm a skillet over medium heat and brown the Sausage.  When fully cooked set aside and wipe the grease out of the pan with a paper towel.
Slice the Mushrooms thinly..and while you are at it chop the Onion.
Add the Oil, Mushrooms and Chopped Onion to the same skillet you browned the Sausage in.  Cook on medium heat until tender. 

Add in the Garlic and cook another 2 minutes or so.

Stir in the Beef Broth and Crushed Tomatoes.  Go slow..this tends to be a messy step.

Add in the Rosemary, Worcestershire Sauce, and a bit of Salt & Pepper.  Bring to a boil then reduce the heat to medium and let everything cook together another 5 minutes or so until the mixture begins to thicken.


Meanwhile, drain the Butternut Squash once it is tender. 

Add in the grated Parmesan Cheese, a good 5 TBSP of Butter, and Salt & Pepper.  Mash together using your potato masher.  Taste and add more Parmesan, Salt & Pepper, or Butter as needed.  Maybe not Butter if you are using 5 TBSP!!
Creamy..dreamy..and delicious!

Add the Sausage back into the pan along with the frozen Peas & Carrots.  Mix everything together really well.  Let it cook a few minutes to let everything warm up a bit.

Place 6 ramekins on a baking sheet.  The baking sheet is very important unless you truly enjoy cleaning your oven.  Give them a good spritz with non-stick cooking spray.

Add in the Sausage/veg mixture almost to the top.  Then spread the heavenly mash on top. 

Oh yeah!  Bake in a 425 degree oven for 15-20 minutes until everything is warm and bubbly.

Top with Parmesan Cheese shavings..and Enjoy!


Shepherd's Pie with mashed Parmesan Butternut Squash
Source: Better Homes and Gardens Magazine 10/2012

2 1/2 Lb Butternut Squash, peeled, seeded, and cut into chunks
5 TBSP Butter
1/4-1/2 C Parmesan Cheese + more for topping
1 Lb Sweet Italian Sausage
1 TBSP Canola Oil
1 Medium Onion, chopped
8 oz packaged Mushrooms, sliced
3 Cloves Garlic, minced
1 C Beef Broth
28 oz can Crushed Tomatoes
1 tsp Dried Rosemary
1 tsp Worcestershire Sauce
1 C Frozen Peas & Carrots

  Preheat oven to 425 degrees.  In a large pot cook the Butternut Squash in lightly salted boiling water.  15-17 minutes until fork tender.  Drain the water then return the Squash back to the original pan.  Add the Butter, a bit of Salt & Pepper, and the Parmesan Cheese and mash together with a potato masher.  Set aside.

In a large skillet cook the Sausage over medium heat.  Break it up into smallish pieces and stir around until fully cooked.  Drain the excess grease and remove the meat from the pan. Set aside.

In the same skillet, add the Canola Oil, Mushrooms, and Onions.  Cook for a few minutes until they are nice and softened.  Add in the Garlic and cook another 2-3 minutes.  Stir in the Beef Broth, Crushed Tomatoes, Rosemary, Worcestershire Sauce, and a bit of Salt & Pepper.  Bring the mixture to a boil then reduce the heat a bit.  Simmer until the sauce has thickened a bit, about 5 minutes.  Add the meat back into the pan along with the Peas & Carrots.  Cook about 2 minutes just to warm everything up a bit.  

Spray 6 ramekins with non-stick cooking spray.  Divide the meat/veg mixture between the cups and top with the Butternut Squash.  Bake uncovered on a baking sheet for 15-20 minutes.  Top with shaved Parmesan and Enjoy! 
    Pin It

September 7, 2012

Summer Vegetable Casserole Recipe

Pin It
Summer is very quickly coming to a close.  My heart is breaking a little right now.  I got up early this morning and noticed a significant chill in the air.  What, a chill!?  I'm not ready for a chill yet!  I even wished I had put a sweater on before I left the house.  I've been enjoying my summer way too much to have it get chilly.  Luckily it warmed right up once the sun came out.  My oldest daughter got to play in the water at her cousins house after preschool which was a perfect way to play off some of her extra energy.

Before summer officially ends I found a yummy recipe for you.  It was seriously simple and my oldest gobbled it up.  My youngest who is just shy of 2 was a bit picky and wouldn't even give it a taste.  My husband and I both really enjoyed this and it made me wish that I had planted a fantastic garden this year so I could use my own produce.  Too bad this year I took the lazy route and no garden was planted.


You will need a Yellow Squash, Zucchini, Onion, Potato, Garlic, Tomato, Cheddar Cheese, Canola Oil, Salt & Pepper, and a Mandolin.
Start by chopping your Onion and mincing the Garlic.  Warm a pan over medium heat, add the Canola Oil, Onion, and Garlic and cook about 5 minutes until the Onion is softened.

Meanwhile, using the Mandolin slice the Potato, Zucchini, Yellow Squash, and Tomato very thin.  I cut the Tomato with a knife to avoid smashing it and making a huge mess with the mandolin.

Spray a casserole dish with non-stick spray.

Place the Onion/Garlic mixture in the dish and spread it out evenly along the bottom.

Place the sliced veggies in the dish alternating the veggies to get a good mixture.  Sprinkle with a bit of Salt & Pepper.

Grab your trusty bottle of Italian Seasoning.

Sprinkle it over the top to your liking.

Cover the dish with foil and bake in a 400 degree oven for 30 minutes.


Meanwhile grate the Cheese.  Make sure to feed some to your 2 year old or she will get really super mad at you.

When the timer dings grab the casserole out and sprinkle the cheese over the top.  Place back in the over for another 15-20 minutes.  You want the veggies to be good and tender at this point.
Gooey Cheesy Goodness.  Gotta love the Cheese.
Enjoy!


Summer Vegetable Casserole Recipe
Source:  Budget Bytes

1 TBSP Canola Oil
1 Yellow Onion
1 tsp Minced Garlic
1 Zucchini
1 Yellow Squash
1 Potato (I used a Yukon Gold)
1 Tomato
1-1 1/2 tsp Italian Seasoning
1 C Shredded Cheddar Cheese
Salt & Pepper to taste

Preheat your oven to 400 degrees.

Chop the Onion and Mince the Garlic.  Warm a skillet over medium heat and add in the Canola Oil, Onion, and Garlic.  Saute until the Onion is softened, about 5 minutes.

Meanwhile, using the Mandolin slice the Zucchini, Yellow Squash, and Potato as thinly as you can.  Using a knife thinly slice the tomato.

Spray a casserole dish with non-stick spray.  Place the sliced veggies standing up alternating the veggies for ultimate flavor distribution.  Sprinkle with a bit of Salt & Pepper to taste (remember that potatoes like Salt).  Then sprinkle the Italian Seasoning over the veggies.

Cover the dish with tin foil and bake for 30 minutes.  Remove the foil and sprinkle the Shredded Cheese all over the veggies.  Place back in the oven and bake another 15-20 minutes.  You want all the Veggies to be tender and the Cheese to be melted.

Enjoy!

Pin It