Showing posts with label Easter. Show all posts

December 29, 2012

Ham Roll Appetizer Recipe

Pin It
Have I mentioned that I am less than 3 weeks away from having my third child!  This is so crazy to me.  I am so not ready...is it possible to request more time?  Although, with how uncomfortable I am maybe I am ready after all.  Such a shame that things get so crowded at the end of pregnancy.  I was remembering back to when I had my first child recently.  One of the funnier memories involves a delicious appetizer and my baby shower.

My Mom and sister threw me a very sweet baby shower and you should have seen the spread of food they prepared.  It was fantastic in every way.  There was so much amazing and delectable treats that it was hard to choose what to snack on.  They made on of my favorites..Ham Rolls!  They are always so yummy and a bonus they are pretty low calorie.  I must have gobbled down a dozen ham rolls, at least.  After the party was over I peeked in the fridge and found that the ham that I had bee consuming all afternoon had expired!!!  Not just by a day or two either.  It was horrible!  Luckily nobody got sick and my sister decided to always check the expiration date when shopping at the Walmart.  You should give these babies a try when you have a party to go to.  Perfect any time of year and in any setting. 


You will need Cream Cheese (the whipped kind spreads more easily), Ham, and Green Onions.
Grab a slice of Ham.

Spread the Cream Cheese almost to the edges of the Ham.
Slice the Green Onion up. 
Evenly sprinkle a little Green Onion over the meat.

Roll the ham up.
Slice into little rolls and Enjoy!


Ham Roll Appetizer Recipe

Ham
Cream Cheese
Green Onion

Evenly spread a TBSP or so of the Cream Cheese over the top of the Ham slice.  Chop the Green Onion up into little slices and sprinkle over the top of the Cream Cheese.  Roll the ham up and slice into mini rolls. 

Enjoy! Pin It

December 12, 2012

Nutter Butter Cookie Balls Recipe

Pin It
Cookies!  Oh yeah..I said cookies!  Every year my sister and I put together a Christmas Cookie Exchange party.  It is so much fun and we get to sample all kinds of yummy cookies.  I like to try something new and exciting every year.  Some of my treats have been awesome..while others have been less than awesome.  But it's all in good fun so I don't mind the flops.  This year I was cruising the web and saw this little beauty and just had to give it a try.  Crumbled up cookies in a cookie!?  What could be tastier?


You will need Mini Nutter Butter Bites, Nutter Butter Cookies, Peanut Butter (I used creamy), Softened Cream Cheese (I used the diet stuff), and Almond Bark.

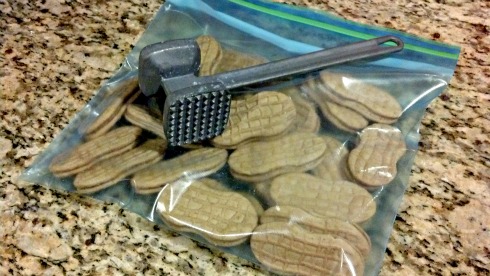
Put the regular Nutter Butter Cookies in a zip top bag and using your meat club crush those babies up.  I did this shortly after putting my children to bed and my crushing woke up my 2 year old.  Perhaps next time I'll crush more gently.

Mix together the soft Cream Cheese and crushed Nutter Butters.

It will come together in a kind of dry and slightly crumbly mixture.


Roll into little balls.  I got just over 2 dozen of them.  Refrigerate at least one hour.  I let them sit overnight.


Grab a handful or two of the Nutter Butter Bites and cut them in half.

In a microwave safe dish (I find a measuring cup works best) place the Almond Bark and Peanut Butter in the microwave.  At 50% power microwave in 30 second increments, stirring after each, until everything is melted and combined.

Prepare your station.  Rolled balls on one sheet.  Melted PB goodness in the middle.  Clean sheet covered with parchment on the other side.  Cut up Mini Nutters close by.
Drop one ball at a time in the melted PB mixture.  Using a fork lightly tap on the dish to remove excess chocolatey goo.

Place the coated ball on the clean cookie sheet.

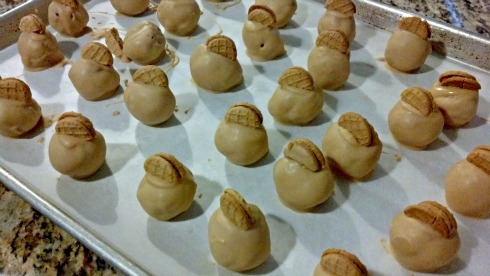
Top wit a mini Nutter.  Repeat until they are all coated and topped.  Allow plenty of time for coating to harden.  You can also place them in the fridge to hurry this process along.

Enjoy!


Nutter Butter Cookie Balls Recipe
Source:  Kraft Recipes

1 8oz package Softened Cream Cheese
24 Nutter Butter Cookies, crushed
3-6 Squares Almond Bark 
1/4 C Creamy Peanut Butter
Mini Nutter Butter Cookies cut in half
 
Mix together the crushed Nutter Butter Cookies and soft Cream Cheese to make a slightly crumbly dough.  Roll the dough into 1 inch balls.  I ended up with just over 2 dozen.  Place on a baking sheet covered with plastic wrap and refrigerate at least 1 hour.  

In a microwave safe dish mix, add the Peanut Butter and Almond bard.  Microwave in 30 second increments at 50% power until everything is melted and combined.  Make sure to stir after every 30 seconds.  Drop the Balls, one at a time, into the Melted PB mixture.  Using a fork, tap lightly on the dish to remove excess coating.  Place on a parchment lined baking sheet and top with one of the mini Nutter Butter halves.  Once all the balls are coated allow the coating to set.

Enjoy!   Pin It

May 5, 2012

Quick & Easy Mushroom & Asparagus Quiche with a Crescent Roll Crust Recipe

Pin It
When I was in Junior High school I had a Home Ec. class that I really enjoyed.  We would make a little something during the class, set the table, and enjoy the fruits of our labors with our partners.  I remember one time we were using a blender to make something.  The schools blender was much different than the one my parents had.  Our pitcher screwed on and off the base...the schools pitcher just sat on top of the machine and the parts screwed together.  Well there I go trying to unscrew the pitcher from the base and I just ended up removing the glass pitcher from the bottom part with the blades and the contents went everywhere!  Sadly we didn't get to enjoy the fruits of our labors that day.  Plus I felt like a total idiot.  From that day forward I swore off blenders and made my team do all blender required activities with me giving moral support from the sidelines.

Despite this horrible memory I also have a fantastic memory that came out of Junior High Home Ec. class.  I tried my very first ever quiche.  It was an amazing Quiche Lorraine and I have had a deep love for Quiche ever since.  The other day I came across this easy Quiche recipe that uses Pillsbury Crescent Rolls dough as the crust.  Let's just say that I was on it like a bum on a Bologna sandwich!


You will need Sage, Oregano, Basil, Mozzarella Cheese, fresh Parsley, Dijon Mustard, Pillsbury Crescent Rolls, Mushrooms, Onion, Butter, Asparagus, Salt & Pepper, Eggs, and Garlic Powder.

Chop up the Onion and Asparagus.

I swear that chopping Onions is very therapeutic for me.  They always get a good cry out of me.

Warm a non-stick skillet over Medium heat and allow the Butter to melt.  Add the Onions, Asparagus, and Mushrooms and cook until the Asparagus is tender but still a bit crisp.

Meanwhile place the Pillsbury Crescent Rolls triangles in a pie pan and press them together to seal the edges. 

In a bowl add together the Cheese, Salt & Pepper, Chopped fresh Parsley, and the spices. 

Mix the Asparagus mixture in with the Cheese Mixture.  Lightly beat the Eggs and add them in and mix everything together very well. 

Spread the Dijon mustard all over the "crust".

Pour the Mushroom/Cheese/Asparagus/amazingness mixture on top of the Dijoned "crust" and bake at 375 degrees for 25-30 minutes.  Make sure a knife comes out of the center clean.

If you notice that the "crust" is getting really dark (which it will) you can cover the edges with tin foil to keep it from burning.

Well howdy!

Enjoy!


Quick & Easy Mushroom & Asparagus Quiche with a Crescent Roll Crust Recipe

1 tube Pillsbury Crescent Rolls dough
2 tsp Dijon Mustard
1 1/2 Lbs Fresh Asparagus cut into 1/2 in bits
1 Onion Chopped (try to pick a strong one to ensure a really good cry)
1/2 C Sliced Mushrooms
1/4 C Butter
2 Eggs, Lightly beaten
2 C Shredded Mozzarella Cheese
1/4 C Roughly chopped fresh Parsley
1/2 tsp Salt
1/2 tsp Pepper
1/4 tsp Garlic Powder
1/4 tsp Dry Basil
1/4 tsp Oregano
1/4 tsp Sage

Warm a non-stick skillet over medium heat and add the Butter.  Once the butter is melted add in the Asparagus, Onion, and Mushrooms.  Cook until the Asparagus is tender but still crisp.

Meanwhile grab a pie pan and place the Pillsbury Crescent Roll dough in with the skinny end of the triangles in the center.  Press together at the edges to seal the crust.  Spread the Dijon Mustard all over the "crust".

Mix together the Cheese, Dry spices, Salt & Pepper, and Parsley.  Add in the Asparagus mixture and the two Eggs, which have been lightly beaten.  Mix everything together really well.  Try to temper the eggs a little (to avoid scrambled egg Quiche) by adding in a bit of the warm Asparagus mixture before dumping everything together.

Dump the mixture out on top of the "crust" and bake at 375 degrees for 25-30 minutes.  Test the center with a knife to ensure it is done.  If the knife comes out clean then supper is ready.

Enjoy!

 P.S. Don't forget to check out the quick and delicious Banana Stack snacks I whipped up last year.

P.P.S. Come back tomorrow for the first giveaway in Blog-A-Pal-Loosa!!  It's gonna be so much fun.

Blog-a-pal-oosa Pin It

April 23, 2012

Peanut Butter & White Chocolate Rice Krispies Treat Recipe

Pin It
Have I got a yummy treat for you today.  I saw this little gem and just had to give it a try. Luckily for me my neighbor had just come home with her adorable new born baby and was in need of a tasty supper.  I whipped up a some delicious Chili Lime Enchiladas and a batch of these White Chocolate & Peanut Butter krispies for dessert.  Boy was I glad I tried these because they were amazing.  They came together quickly and easily and I only had to use my microwave to melt the chocolate.  Whip these up right away because you are going to love them.


You will need Mini Marshmallows, Mini Chocolate Chips, White Chocolate Chips, Peanut Butter, and Rice Krispies.

Slowly melt the chocolate in a microwave safe dish.  I started by lowering the power to 50% and went for 1 minute, stirred, and then nuked in 30 second increments.  Make sure to stir between each nuking. 

Add the Peanut Butter into the melted White Chocolate

and mix it all together well.  At this point you should probably enjoy a little taste..just to make sure it is as good as you imagine it is.

Add the Rice Krispies in with the White Chocolate/PB mixture.  This dish was too small so I actually moved it to a bigger dish when I realized that mixing without spilling was impossible.

Add in the Mini Mallows and the Mini Chocolate Chips and mix together well but gently.

Spray a 9x9 dish with non-stick spray.

Then add the mixture and gently press down.  No need to crush it..just press a bit.

Top with a few extra Mini Chocolate Chips and let it set up for an hour or two.  When the chocolate has hardened cut them up.

Make sure to take some to your neighbor who is in desperate need of a meal. 


Then you can enjoy one for yourself.


Peanut Butter & White Chocolate Rice Krsipies Treat Recipe
Source:  Cookies and Cups

12 oz Bag White Chocolate Chips
1/2 C Creamy Peanut Butter
3 C Rice Krispies Cereal
1 1/2 C Mini Marshmallows
1/4 C Mini Chocolate Chips plus a bit extra for Garnish

Lightly spray a 9x9 dish with non-stick cooking spray.

Using a microwave safe bowl melt the White Chocolate Chips in the microwave.  Set the power to 50% and start by setting the time to 1 minute.  Stir the Chocolate and stick back in continuing to use 50% power in 30 second increments until the Chocolate is fully melted.  Be careful to stir well between each use of the microwave.  You don't want to over melt the Chocolate or it will turn out hard and weird.

Once the Chips are fully melted add in the Peanut Butter and mix together really well.  In a large bowl add the Rice Krispies, Mini Chocolate Chips, and Mini Marshmallows.  If the Chocolate mix is really warm you may want to wait a few before you add in the highly meltables but I just threw them right in.  Mix everything together gently but thoroughly.

Transfer the Krsipies mixture to the dish and press it down gently.  No need to press too hard and crush everything together.  Sprinkle a TBSP or two of the Mini Chocolate Chips on top pressing them down a bit to make them look very pretty.  Allow them to cool for an hour or two. 

Cut into treats and Enjoy. Pin It

April 18, 2012

Pineapple Upside Down Cake Recipe

Pin It
I love Pineapple Upside Down cake.  When I was a kid my Mom would make it in a dutch oven when we would go camping.  I am pretty sure that there is nothing as delicious as a dutch oven dessert when you are camping.  I imagine the fact that we were always running around, playing, being wild, and getting hungry all day didn't hurt either.

The other day I had a serious hankering for a Pineapple Upside Down Cake.  It was pretty crazy.  I just had to make one and eat some.  It was so delicious and reminded me of the good old camping days.  You can't beat the flavor that the brown sugar and butter get when mixed with the pineapple and cherries.  Oh yum!  If you haven't tried this type of cake you must make one..and quickly too.

You will need Oil, Yellow Cake Mix, Eggs, Maraschino Cherries, Pineapple Rings, Butter, and Brown Sugar.

Distribute the Butter along the bottom of a cake pan. 

Top the Butter with Brown Sugar.  Place it in the oven as it is warming up to 350 degrees.

Prepare the cake mix according to package instructions.


It's an extra bonus if your adorable 4 year old helps you with the mixing.

Check on the Butter and Brown sugar mixture, it's done when everything is melted together and bubbly and amazing looking.  This step only takes a couple of minutes so keep an eye on it.

Top the bubbly mixture with Pineapple Rings and put a Maraschino Cherry in the middle of each ring.

This looks divine already.


Top the Pineapple rings with the mixed cake batter and bake at 350 degrees for 42-48 minutes or until a toothpick comes out clean from the center.

Run a butter knife around the edges of the pan shortly after it comes out of the oven.  Let the cake sit for a few minutes, but no more than 5 or it will become tricky to remove the cake from the pan.

Dump the pan upside down and enjoy a delicious slice.


Pineapple Upside Down Cake Recipe

1 Box Yellow cake mix (plus the ingredients needed according to package instructions)
1 Can Pineapple Rings
12 Maraschino Cherries
1/4 C Butter
1 C Brown Sugar

Pre-heat oven to 350 degrees

Cut the Butter into small chunks and evenly distribute them along the bottom of the cake pan.  Top the Butter with the Brown Sugar and stick in the oven while it pre-heats.  Check it in a couple of minutes, you want everything melted and bubbly.  Watch carefully though, you don't want it to burn.  Remove once melted and bubbly.  Then, arrange the Pineapple rings along the bottom of the pan and place a Maraschino Cherry in the middle of each ring. 

Meanwhile prepare the cake mix according to package instructions.  Pour the batter over the Pineapple/butter/brown sugar mixture and place in the oven and bake 42-48 min but check around 30 min with a toothpick to make sure it isn't cooking too quickly.  Remove when a toothpick comes out clean.

Run a butter knife along the edges of the pan to help loosen the cake.  You want to let the cake set a minute but no longer than five minutes.  Grab a cookie sheet or serving platter and place on top of the cake pan.  Flip it over and everything should come out quick and easy.

Enjoy! Pin It